Setting Up Microsoft SQL Snapshot Replication
A Step-by-Step Guide
Check the following before setting up Snapshot replication:
1. The Localsystem account has no access to shares on the network as it isn't an authenticated network account.
So, if you want to set up replication you must change the account that MSSQLServer and SQLServerAgent services runs under to a Windows NT account with Administrator's rights. If your Microsoft SQL Server runs on Windows NT, Windows 2000 or 2003, you can create an account in Computer Management or Active Directory Users and Groups.
Windows 9x does not support Windows NT services, so if your Microsoft SQL Server runs on Windows 9x, you do not need to create an SQL account.
Click on Start, Setting, Control Panel, Administrative Tools and Computer Management. In left pane of Computer Management press on plus sign of Local Users and Groups. Right Click on Users and select New User...

Choose a username and password for the account and check the
Password never expires box. Then press on Create button.

Find the account in the right pane Computer Management and choose
the Properties.

In the Member of tab of user Properties click Add and select
Administrators group. Then press Apply and ok.

For changing the SQL Server Agent login account click on Start, Setting,
Control Panel, Administrative Tools and Services.
In Services
find SQLSERVERAGENT and right click on it and choose properties.

In Log On tab of SQLSERVERAGENT Properties select "This account" and type or browse the user account which we've just created it.
Enter and confirm the password. Then press Apply.

In General tab Press Start to start the service.

You should repeat all theses steps for MSSQLSERVER service as well
and change its Log On account like SQLSERVERAGENT.
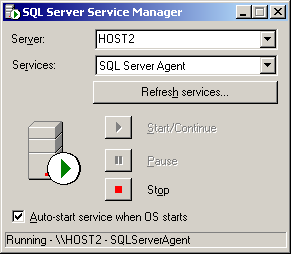
Open SQL Server service manager and choose SQL Server Agent from
drop-down menu and make
sure "Auto-start service when OS starts" box is checked.

2. Only members of the Sysadmin server role can set up and configure
replication, so if you do not have these rights, you cannot set up
replication.
3. Don't forget to start the SQLServerAgent service (and the MSSQLServer
service, of course).
4. You should allocate adequate disk space in the snapshot folder.
5. You should allocate adequate disk space for the distribution
database.
6. You should ensure that the server being replicated to is defined as a
remote server.
Step-by-Step Guide:
In Snapshot replication, we want to copy and distribute your server data (Local Server) to SQL.RAVAND.COM server (Remote Server). To set up Snapshot Replication you can use SQL Server Enterprise Manager.
First of all you should register the remote server to be replicated.
In Enterprise Manager left pane, right click on SQL Server Group
and click on New SQL Server Registration...

In the Register SQL Server Wizard click Next. In "Available servers"
box type: SQL.RAVAND.COM and the press Add >
It should be added to the
"Added servers" pane. Then click Next.

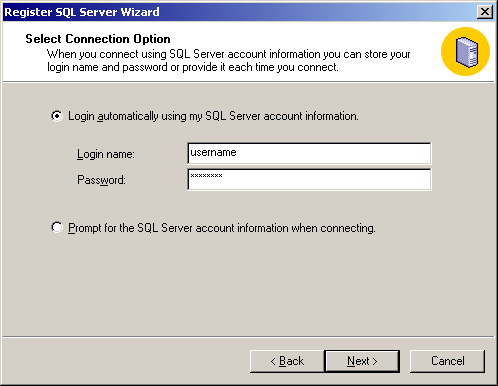
For Authentication Mode select the "SQL Server login information that
was assigned to me by the system administrator (SQL Server
Authentication)" and the click Next.

Enter your SQL login name and password, then click Next.

Make sure that Add the SQL server to an existing SQL server group is
selected, then click Next.

Click Finish and wait untill get "Registered successfully" message.
Press Close.

After registering Remote Server in Enterprise Manager, if Local and
Remote servers
are not started right click on them and click Start.

In this Example, we will replicate data from the Test1 database into
Testdb database.
For setting up Snapshot Replication, click on you
local server (here is HOST2) and from Tools menu choose
Replication then
Configure Publishing, Subscribers, and
Distribution.

On "Configure Publishing and Distribution Wizard" Welcome page click
Next, and Select you local server as Distributor. Click Next.

Specify Snapshot folder using a network path and click the Next
button.

Now you can customize the publishing and distribution settings, or
you can choose the default settings. Check No, use the following default
settings and click the Next button.

Click the Finish button.
Click OK button. As we installed HOST2 as Distributor, so Replication
monitor has been added to the console tree on HOST2 server. Click Close
button.

Now we are ready to start creating publications and articles. In
Enterprise Manager in Tools menu select Replication then
Create and Manage Publications...

You will see "Create and Manage Publications" dialog box. Choose
Test1 database and click the Create Publication button.

The "Create Publication wizard" will be launch. Click the Next
button. Choose the Test1 database
and click the Next button.

Select Snapshot publication and click Next.

Select Type of subscriber that you expect to subscribe to this
publication. In this example SQL.RAVAND.COM running SQL Server 2000.

Choose table or tables to publish as article and click the Next
button.

Click Next.

Select a name and description for this publication. Click Next.

Now you can define data filter or customize the remaining properties
of this publication or
you can choose the default settings. Check No, create the publication as
specified, and click the Next button.

When creating publication is completed you will get this message.
Click Close.

Now you can create new subscription Click the Push New Subscription
button.

This will launch the Push Subscription wizard. Click Next. Select
the Subscriber from the list. Click Next.

Specify the subscription database at the SQL Server Subscriber.
Click Next.

Specify how frequently the Distribution Agent updates the
subscription. You can choose Continuously or using schedule. For
changing the schedule click Change button. When you choose the schedule
click Next.

Specify whether the subscription needs to be initialized. Select
Yes, initialize the schema and data. Click Next.

Now you can see the status of Required Services. Click Next.

In left pane of Enterprise Manager select Replication, Publication
and Your database name. Here is Test1. in the right pane you can see the
status of the Subscription. It should be Active.

You can Monitor the Replication in Enterprise Manager, Replication
Monitor section.

If you would like to change Snapshot Agent Schedule you can right
click on it and select Agent Properties.

Here you can Edit or Create New schedule for this agent.

If after configuring replication you decided to add some table to
your database and would like to add those tables to the replication
process follow theses steps.

In Enterprise Manager from Tools menu select Replication then
Create and Manage Publications.

In Create and Manage Publications dialog box, select Test1 database
and click Properties and Subscriptions button.

In Articles tab of Publication Properties, check Show unpublished
objects box. Then choose the new table(s) from the right pane. Click Ok.

When you are asked if you are sure you want to publish this article
click Yes.


